
|
I have wanted to make this post for a while now, but needed to wait until my current batch ran out so I could document making my next batch. I have been waiting since last August. Yes, SEVEN months! And even now, I'm not out, but it's getting to the end and I don't want to wait anymore! But before I start my step by step instructions, I want to share why I am all about homemade. Yes, I am a Naturopathic Doctor and Momma and want to get rid of all of the chemicals from my home and by making my own stuff I get to control what goes in. It's healthier and safer, all around win. But I am also an ND building my practice and a Momma to an 18-mos old, my time is sparse. So, I need to balance my desire to DIY with how practical it is to actually make everything. All of the DIY things I post are honest to goodness super easy and super practical (promise). And I won't lie, my other big factor is cost savings and $20 for a batch of laundry detergent that lasts me 7+ months is totally worth the 10 minutes it takes to make up! (and let's be honest, with a toddler I feel like all I do is wash laundry, I'm talking on average about 6-8 loads a week). I again have to thank Pinterest for the inspiration, a quick search on there will bring up a zillion different recipes and links. I browsed around a few until I found one that I thought would be easiest and had ingredients I was ok with. There are many options for both liquid or powder, I personally prefer the powder because I think it's less messy and easier to use, but to each their own, this recipe is for a powdered detergent nonetheless. Homemade Laundry Detergent Recipe 3 Dr Bronner's Magic Soap Bars 4 cups washing soda 4 cups borax 1 500g box baking soda I just add everything to a sturdy plastic bag for mixing! The first time, I left everything in a bowl and tried to mix it all, it created quite a bit of dust (which you don't really want to breath in) and it was difficult because of the quantity. 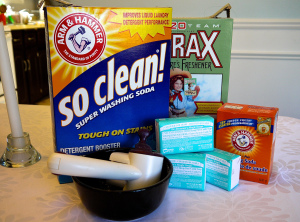 Start by grating up your soap bars. I even purchased a cheap cheese grater from Walmart (I think it was $3-4) to use specifically for this purpose. 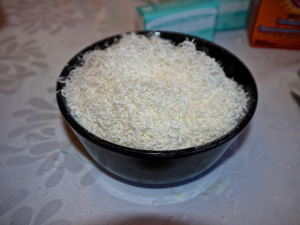 Measure out your washing soda, borax and baking soda and add it to your bag. Twist the top and give it a good shake. 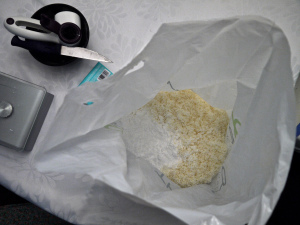 Pour out a a bit of the mixture into a container and you're done! 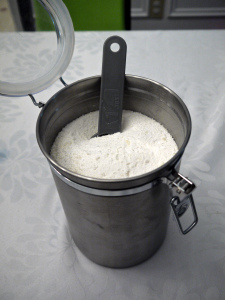 Again, I was able to find cheap plastic measuring spoons at Walmart for $1 and so I leave a tablespoon in the container with my detergent for easy measuring. I leave the rest of the detergent in the plastic bag, twisted up and just refill my container as needed. You only need to use about 2 tbsp of detergent per load. And just to give you an idea of how versatile this recipe is, the first time I made it I thought I used one site/recipe I had found on a website, but when I went to make it this second time, the amounts I had left didn't add up compared to what this recipe called for, so I found another one, tweaked it a bit and voila! However, I feel like this recipe used less of the ingredients then my last batch, so it may not last a full 7 months like the first. I'll let you know in 6+ months when it finally runs out!
Some Notes: Yes, this detergent contains borax. This is a somewhat controversial ingredient with some mixed safety profiles. I read a few opinions on it before deciding to go ahead with it. For the purpose of this post, I did a little more research. Here is some of what I found:
My first batch of detergent I used only Unscented Baby- Mild Bronner's Soap, which leaves your clothes pretty much completely odourless. This time I am using 2 of the Unscented and 1 of the Peppermint soap. Bronner's makes an array of different scented soaps so you can pick one you like if you do want your clothes to have a scent. Bronner's Soap is a bit pricier (the most expensive part of the detergent) but it often goes on sale even at Zehr's so just keep an eye out for it. Washing soda was the hardest ingredient for me to find! I checked a tonne of grocery stores and nothing! The Home Hardware on Weber (between Columbia and University), for those of you in Waterloo area, said I was not the first person to ask and that they would order it in for me, amazing! In the meantime, I was at the shops at uptown Waterloo, I wandered into the Food Basics just on the off chance, and sure enough they had it in stock! So if any of you are having trouble locating this apparently lucrative powder, those are two places which will more than likely have it in! Although I am a cloth diapering Mamma, I have not used this on my daughter's diapers. Mainly because I had already bought a case of Tiny Bubbles Cloth Diaper detergent (from Costco) and still have a few boxes of that left. However, I can't see it being an issue.... This recipe is front loader safe, ie. HE detergent. It doesn't really create any bubbles so no overflow, which is apparently the only real concern about the HE label. Tip: It cleans quite well, but if I want things to really whiten (like my white dining room chair covers) I add a good dash of baking soda right into the powdered soap tray with this detergent to really give it a 'bleaching' boost (as you will soon find out, baking soda has become like my best friend!) The Health Benefits So making this soap is also part of my go green challenge! And so I will give you a little run down about the ingredients that now are NOT part of my laundry detergent (ie what is found in most commercial detergents).
Disclaimer: Naturopathic Doctors strive to provide individualized health care. The information contained in these topics is not intended nor implied to be a substitute for professional medical advice, it is provided for educational purposes only. This information shouldn’t take the place of seeing an ND for individualized health recommendations.
0 Comments
I am a sucker for bran muffins. I know bran usually has this 'healthy' connotation to it, but the unfortunate truth is that most muffins are chock full of sugar. Most of the time you might as well be eating a cupcake! Take a Tim Horton's Raisin Bran muffin for example (nutritional info from the Tim Horton's website)
69 grams of Carbohydrates and 40G OF SUGAR!!! Just to give you an idea of how much this actually is, the donut on their menu with the highest amount of sugar is their sour cream glazed and it only has 29g of sugar! Plus, remember that's only 40g of added sugar, there is another 24g of carbohydrates (starch) which the body recognizes as the same as sugar. This is the exact reason I am all about homemade! With a 17-month old who seems to be constantly eating it's important for me to have healthy snacks on hand. It's easier than you may think to re-make an everyday recipe into a healthier one. I found this recipe for oat bran muffins at the Joy of Baking (http://www.joyofbaking.com/muffins/OatBranMuffins.html). It's not a bad recipe, and it's not too horribly full of sugar (although there is more than enough!) and it does contain wheat and dairy. So the first batch I started by just substituting gluten and dairy free ingredients and cutting down on the sugar. It worked very well, but I still wanted to go healthier. So, the second batch I cut out all the brown sugar, subbed agave nectar for the honey and upped the fiber. It worked alright, but this batch came out pretty dense and somewhat lost the 'enjoyability' factor. I went back to adding a reduced amount of sugar and then it dawned on me: Applesauce! So after a few final adjustments and add ins here is my final recipe: 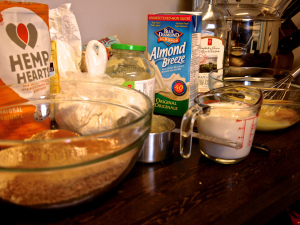 Gluten-Free, Diary-Free, Sugar-Free Oat Bran Muffins 1 cup oat flour 3/4 cup oat bran 1/4 cup hemp hearts 1/3 cup ground flaxseeds 1 1/2 tsp baking powder 1/2 tsp baking soda 1/2 tsp ground cinnamon 1 egg 1/2 cup unsweetened organic apple sauce 1 tsp vanilla extract 2 tbsp grapeseed oil 1 1/4 cup unsweetened original almond milk 1/2 cup raisins 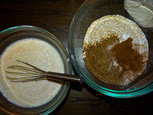 Mix all the dry ingredients together in a bowl. In another bowl, whisk the egg and add the rest of the wet ingredients (applesauce, vanilla, grapeseed oil, almond milk). Mix the egg mixture into the dry ingredients just until moist. Add the raisins. Bake at 400F for 16-20 min and enjoy! So how much better is this new version compared to the original? Well here is the nutritional breakdown (thanks to caloriecount.about.com- although it doesn't show the vitamin and mineral changes). 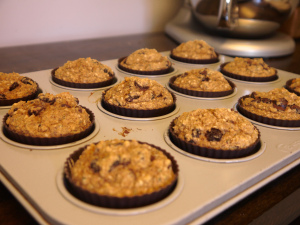
The sugars were reduced by almost 10g, the fiber almost doubled, total carbs almost in half, protein increased by over a gram and calories reduced! You will see the fat has increased, this is because of the added seeds (flaxseeds and hemp hearts) but it's not a concern since its healthy fats we increased! And that's not even considering the vitamin and mineral differences between the two! The verdict.....mmmmmmmmm!  Notes about the changes:
Oat flour: gluten-free naturally, any gluten is due to contamination so if you do have a sensitivity to gluten, make sure you get Certified Gluten Free Oat Flour/Oats. Oat flour can easily be made by processing oats into flour. It bakes very well and isn't crumbly or gritty like rice flour can be. Hemp Hearts: An overall amazingly healthy food! High in fiber, protein and healthy polyunsaturates fats (including omega-3s)! Not to mention packed full of vitamins and minerals (3 tbsp gives you 30% of your daily iron!). It's an easy addition to almost anything, like the flaxseeds you don't really even notice them there! Ground Flaxseeds: I like adding this to anything I can! It has no real taste and is pretty much just pure fiber! The fiber will help to slow digestion of the carbohydrates and keep blood sugars more level. Plus, most of us in North America don't get enough throughout the day at all! Applesauce: A great natural sweetener to use as a sugar substitute. Because it's just blended apples, you are avoiding added sugars and still getting the fiber! Grapeseed oil: This is a more stable oil and has a higher smoking point, making it much better for cooking at high temperatures than less stable oils like olive. Disclaimer: Naturopathic Doctors strive to provide individualized health care. The information contained in these topics is not intended nor implied to be a substitute for professional medical advice, it is provided for educational purposes only. This information shouldn’t take the place of seeing an ND for individualized health recommendations.  I am getting back on the train, the blogging train. You could call it my 'new year's resolution,' but I'm not a big believer in the concept. I think that every day is an opportunity to make a change in your life! Picking January 1st as the only day to make the commitment can set you up to fail. It's a growing process and it takes a little work every day to make the changes you want. Which brings me to my 'every day' resolution; for the last six months or so I have been making the commitment to "go green." To remove the chemicals from my home. Especially now that I have a daughter, I have been striving more and more to get the bad out and the good in! So I am going to share my journey to clean products and let you know a few of the common ingredients in the common products to avoid and why! I first started to 'go green' after actually looking at the ingredients in my skin care (face wash, toner, moisturizer, soap). Have you ever looked at yours? It was kind of scary to see chemical after chemical listed. I mean, I was putting this on my face every day! It was being absorbed into my skin and body every day allllll day! I had started using a full skin care regime in high school, it had been YEARS of lathering on these chemical laden products! And even though they claimed to make your skin just perfect, I found I still had the odd break out (I am lucky to have pretty clear skin). So I started to make an effort to change it to healthier products. It's difficult to know where to begin, there are SO many products plastered with claims, but the claims aren't always fully accurate. My first switch was to a well-known larger brand found in most of the big stores (like Loblaws Organics Section). Even with these more natural products, they were still not great.  It was by chance that I found the products I use now; thanks to Groupon. There was a random offer for holistic skin care. It was very good deal, so I said I'd give it a chance. I am still so glad I did. Pretty Cosmetics is my personal favourite, not only are their products some of the cleanest products I have seen, but they are a small Canadian company (based out of Toronto) started by two holistic nutritionists. However, there are a tonne of great companies (and products) out there; Suki, Olivier Soapery, Coastal Classics and even Burt's Bees to name just a few. However, you also have to be a bit savy, just because one product from a company is good, doesn't mean they all are! A quick google search will bring up a tonne of options! But how does the stuff you're using now rate? You can check it out at the Environmental Working Groups website Skin Deep Cosmetic Database. If the product isn't listed, you can look up each ingredient individually.
Here are a few of the common ingredients in many skin care products that should definitely be avoided and why: Fragrance: this is in just about EVERYTHING, but did you know that Federal Law doesn't require companies to list any of the chemicals that are actually in their fragrance 'mixture'? Fragrance can contain just about anything including hormone disrupting chemicals and are one of the most common allergens in the world. Parabens: These are estrogen-mimicking chemicals and have actually be found in breast cancer tumors in 19 out of 20 women! They can disrupt the endocrine system and cause reproductive and developmental disorders. Phthalates: Studies have shown a link with male reproductive system disorders. This disruption can even occur in utero, which is why pregnant women should also avoid phthalates! The most interesting part, is that since switching from the 'high end chemical-promised skin care' to the clean, chemical free products my skin has never been clearer! Plus, it's important to remember, every time you slather something on your skin, it's absorbed deeper into your bloodstream and then it's your liver's job to get rid of it. Another reason why detoxing is so important, but that's another topic, for another day! When you really start to look at the products and ingredients you are using, it can seem daunting to try and remove all the chemicals, but pick one item at a time and find an alternative. You'll be amazed at how quickly you will start to notice a difference! Disclaimer: Naturopathic Doctors strive to provide individualized health care. The information contained in these topics is not intended nor implied to be a substitute for professional medical advice, it is provided for educational purposes only. This information shouldn’t take the place of seeing an ND for individualized health recommendations. These kale chips are so delicious that sometimes my husband and I actually fight over them. Sad but true. Instead of grabbing those nutrient lacking potato chips the next time you are craving that salty snack, try these instead, they are delish, trust me! How to make: Wash kale leaves and rip leaves into bite sized pieces. 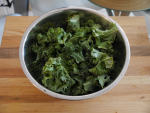 Lightly toss in oil (grapeseed is a great choice because of it's high smoking temperature), I will use my fingers to mix the leaves to make sure they are lightly coated so that less oil needs to be used. Spread the kale pieces on a baking sheet in a single layer, sprinkle with sea salt and bake at 350F for about 10 minutes. 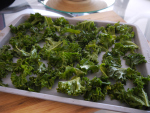 Don't crowd the kale or it can go a bit soggy. You can also toss them mid way through to help ensure they get crisp. Keep an eye on them so they don't burn, browning a little is ok!  When they are done to your liking, remove them from the oven and enjoy!!!
Disclaimer: Naturopathic Doctors strive to provide individualized health care. The information contained in these topics is not intended nor implied to be a substitute for professional medical advice, it is provided for educational purposes only. This information shouldn’t take the place of seeing an ND for individualized health recommendations.  The Whole Life Nutrition Cookbook is one of my all time favourite cookbooks! It is packed full of delicious healthy meal ideas and most of them very kid friendly! To top it all off, the writers of the cookbook, Alissa Segersten and Tom Malterre, also have a blog where they post some of their most popular recipes and new recipes they have created since the book as been released. So, if all my raving about this book hasn't convinced you to invest yet, you can pop over to their website and 'test drive' some of their scrumptious recipes! I think we can all agree, in the summer when the sun is shining, there is nothing better than a frozen treat. However, most of the usual options are packed full of sugar and high fructose corn syrup. Not the greatest options. Creating your own 'popsicles' is a fabulous way to tailor the ingredients not only to your taste but also to make sure they are healthy treats as well. A super simple way of making your own popsicles is to simply select your favourite berries or fruit (fresh or frozen) blend with some water or even a rice or nut milk and then simply freeze in a popsicle mold. Not only are you avoiding the added sugars of most of the commercial popsicles but you are also getting all the health benefits of having real fruit, from the vitamins and minerals right to the fiber. Berries are also one of the lowest glycemic index fruits. For more of a 'creamsicle' treat, try adding some coconut milk to the blended fruit before freezing! 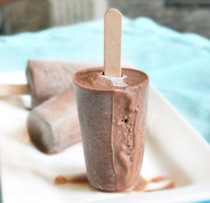 However, if you are craving a creamier, more chocolatey option, try out this recipe from the Whole Life Nutrition's Blog.
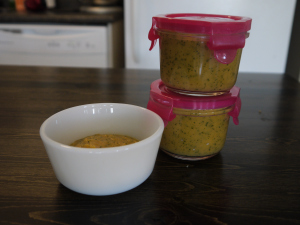
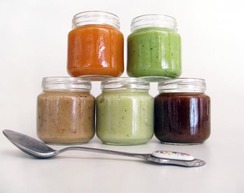
8 medjool dates, pitted 1/2 cup water 3 medium avocados, pitted 1 cup coconut milk 1/4 cup honey 5 to 7 tablespoons cacao or cocoa powder 2 teaspoons vanilla pinch sea salt Place the dates into your blender or Vita-Mix and cover with the 1/2 cup water. Pack the dates down if needed so they are covered, for the most part, in the water. Let soak for about 30 minutes. Then add in the remaining ingredients and blend until very smooth and creamy. Depending on your blender, you may need to add a little extra coconut milk or water. Pour into small bowls and serve as pudding or pour into popsicle molds and freeze for at least 6 hours. Run under hot water to release. Source: www.NourishingMeals.com Check out their blog for even more tasty treat ideas! Enjoy!!! Disclaimer: Naturopathic Doctors strive to provide individualized health care. The information contained in these topics is not intended nor implied to be a substitute for professional medical advice, it is provided for educational purposes only. This information shouldn’t take the place of seeing an ND for individualized health recommendations.  There are many reasons why you should consider making your own baby food versus buying the pre-made. Making your own baby food lets you know (and control) exactly what you are feeding your child. By making it freshly at home you can skip any added preservatives, such as extra salt. Also, you can control the cooking method and freshness to ensure that you are getting the most nutritional value from your foods. It's also pretty fun creating new concoctions for your little one to try! I have found it to be a great experience and pretty easy as well! So for anyone who is considering this but a little hesitant on where to start and whether it's for them or not, here are some tips and tricks and things I have learned along the way.

 A Couple of Notes:
 Disclaimer: Naturopathic Doctors strive to provide individualized health care. The information contained in these topics is not intended nor implied to be a substitute for professional medical advice, it is provided for educational purposes only. This information shouldn’t take the place of seeing an ND for individualized health recommendations.
 When it comes time to introduce solids to your little one, it can be confusing! There is so much information out there, and it's hard to know where to start, or when to start! So here are some of the basics! When to start: Though some practitioners may recommend beginning little ones on foods around 4 mos, I would recommend pushing off until as close to 6 mos as possible. Babies' digestive tracts are still developing but are almost fully matured around 6 mos. By delaying food intro until then, can help reduce the risk of developing food sensitivities. However, it's also important to follow babies lead. We introduced solids at 5.5 mos after many cues from Lily that she was ready, my favourite, opening her mouth along with our bites! What to start with: This is probably the most confusing part of food intro! And there is lots of info.....
How to Start: When baby seems ready pick a day and plan it out.
 Disclaimer: Naturopathic Doctors strive to provide individualized health care. The information contained in these topics is not intended nor implied to be a substitute for professional medical advice, it is provided for educational purposes only. This information shouldn’t take the place of seeing an ND for individualized health recommendations.
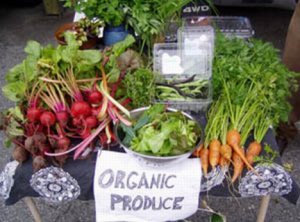 The Shopper's Guide to Pesticides ranks pesticide contamination for 53 popular fruits and vegetables based on an analysis of 51,000 tests for pesticides on these foods, conducted from 2000 to 2009 by the USDA and the federal FDA. Nearly all the studies on which the guide is based tested produce after it had been rinsed or peeled. Contamination was measured in 6 different ways: % of samples tested with detectable pesticides; % of samples with two or more pesticides; Average number of pesticides found on a single sample; Average amount of all pesticides found; Maximum number of pesticides found on a single sample; Total number of pesticides found on the commodity. The fruits and vegetables were then ranked from most pesticides to least. According to EWG’s calculations, by choosing 5 servings of fruits and vegetables from the Clean 15 rather than the Dirty Dozen, you can lower the volume of pesticide you consume daily by 92%!!! For More info visit www.ewg.org/foodnews/  The Dirty Dozen
 The Clean Fifteen
Taken from Spring 2012 Newsletter, to download your own copy of the newsletter, under Resources! Disclaimer: Naturopathic Doctors strive to provide individualized health care. The information contained in these topics is not intended nor implied to be a substitute for professional medical advice, it is provided for educational purposes only. This information shouldn’t take the place of seeing an ND for individualized health recommendations.  Trying to walk the aisles of a grocery store without seeing products covered with health claims is pretty much impossible anymore. From "low fat" to "source of fiber" to the heart healthy check. Marketing is good. Very good. Unfortunately, many of these claims are only half true. One of my biggest issues is the heart check symbol. A quick look at the Heart and Stroke website shows a HUGE list of foods that have received this health symbol. Checking their nutrient requirements in which to receive the symbol looks extensive but let's take a closer look. The first food listed is fruit juice. The requirements: No added Sugar, a Source of Vitamin C (50%) OR Vitamin A (25%) OR folate (25%) OR fiber (2g). Sounds good, right? But let's put this in perspective, a quick look at one of the products that has received this symbol shows that in 1 cup of this juice, you are getting 160 calories, 39 grams of sugar (!!!!!), NO fiber, NO protein, NO fat. You are essentially drinking a glass of sugar. There is more sugar in this one glass of juice than in a Snickers candy bar! In comparison a medium apple has only 71 calories, 19 grams of carbs (including 3.3 grams of fiber), and a whole lot more nutrients. In general, I don't recommend drinking juice. At all. Eat fruit, drink water. This is a perfect example of a half truth. It's true that this product doesn't contain unhealthy fats. But does that make it a healthy choice? Absolutely not. Another great example is the appearance of every product containing olive oil these days. Olive oil is high in Omega-9 fats and has been shown to benefit heart health. In fact, 2 tbsp/day of raw olive oil has shown benefit in cardiovascular health! Many products have now added olive oil and slap a health check on their products. The problem is, the amount of olive oil in a lot of these products is only a very small percentage. For example, popular margarines only contain 8%. Out of the entire product. The rest is canola oil which hasn't shown the same health benefits. Not to mention the artificial flavour and colours added. Again, yes this product has some heart healthy oil in it, but is it a healthy product overall, no. Some easy health points to remember: 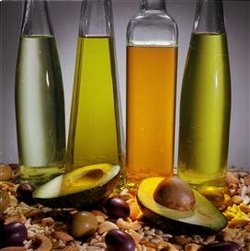
Disclaimer: Naturopathic Doctors strive to provide individualized health care. The information contained in these topics is not intended nor implied to be a substitute for professional medical advice, it is provided for educational purposes only. This information shouldn’t take the place of seeing an ND for individualized health recommendations. 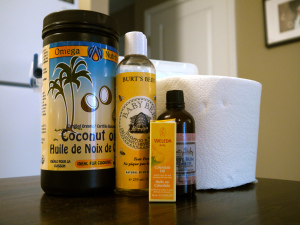 There is nothing better for a parent than a happy rash free baby bum. Baby wipes are a necessary evil. There are many wipes on the market claiming to be natural or organic with a hefty price tag. However, even these tend to contain chemicals that are known skin irritants. The only way to ensure that what you are using is safe and natural is to make it yourself (this is the same rule that is recommended when it comes to cooking!). I started out using Natural Sensitive Baby Wipes but have since switched to homemade wipes and i. love. them. Not only are they exceptionally simple to make, they will save you a couple dollars to boot! What you need:
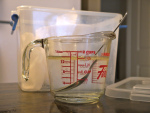 A couple notes: If you choose to use coconut oil, you'll need to use warm water so that the oil melts since it's in a solid form at room temperature. I also like to add a couple drops of Calendula Oil to the mix to help soothe any sensitive skin, Wedela has a great one! This batch of wipes I also added a bit of Baby Bum Remedy by Pretty Cosmetics (an amazing holistic skin care line). Also, I have been using Paper towels from Costco, which are extra large so I use a bit extra of everything to make sure all the towels are moist. This recipe is super versatile too and can be used as wet naps or even make up remover towlettes! 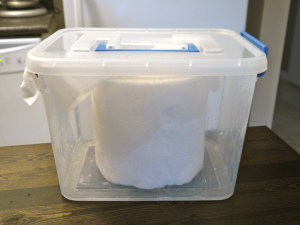 Disclaimer: Naturopathic Doctors strive to provide individualized health care. The information contained in these topics is not intended nor implied to be a substitute for professional medical advice, it is provided for educational purposes only. This information shouldn’t take the place of seeing an ND for individualized health recommendations.
|
AuthorWrite something about yourself. No need to be fancy, just an overview. Archives
August 2016
Categories
All
|
 RSS Feed
