
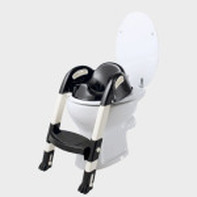
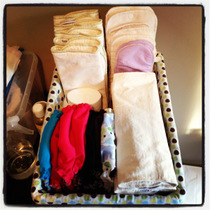
 This is the exact one we have (colour and all), just sparing you a photo of my daughter actually using it! This is the exact one we have (colour and all), just sparing you a photo of my daughter actually using it! As promised, since my first instalment of my favourite baby products was such a hit, I am going to follow it up with some more of the things we found amazing as our daughter grew! She is now 3.5 years old, in preschool and completely potty trained- so we've gone through a lot more stuff! Potty Training Potty: Is it just me or is the benefit of potty training that you don't have to deal with poo anymore? I don't really get the mini toilet potty's- you still have to dump them. Pass. For our 'potty' I knew what I wanted- the same toilet seat I remember having as a kid. We went with the Kiddyloo by Thermobaby. I love this thing! My daughter can go and do her business all by herself- she is even at the point where she can put it on the toilet herself. Again, the benefit of potty training is to get a little freedom- this gives both you and little this. I actually had a friend visit with a daughter the same age and she was amazed that her daughter went and used the washroom all on her own. Completely independent. She pretty much decided then that she needed one- we got ours at Snugglebugz again, but when she went to grab it, they didn't have them. However, it shows on their website that they are back in stock. But a quick google search shows there are other stores as well. It's amazing how much kids will step up when you give them the freedom to be independent. My daughter is able to go to the washroom whenever she needs to without assistance, and she does! I will note, when she first started really using it (around 2/2.5), I did obviously have to help her get up and down and pull down pants, etc. but again, because it just sits right on the real toilet, all you have to do is a flush- no emptying! 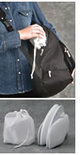 Exact seat, just, again, sparing you an in use photo. Exact seat, just, again, sparing you an in use photo. Portable Toilet Seat: This is definitely one of the best investments I have made! My daughter was completely potty trained by 2.5 years old. I became pregnant with my second right around her 3rd birthday. Trying to hold my 30 lbs 3 year old over an adult toilet so she wouldn't fall in was hard enough, add being hugely pregnant and nauseous to boot makes for not exactly an enjoyable washroom trip. This little seat I found at a local baby store is by Mommy's Helper called the Cushie Traveller, it's portable, folds right up and comes in a little carrying bag and just needs to be placed on top of a regular toilet and Voila! Toddler toilet! And for under $20! I have used this at restaurants, grocery stores, movie theatres, even while visiting friends'- because unless they have a toddler as well, there isn't a seat for them. It's small enough that I just leave it in my diaper bag and my daughter will even remind me to bring it when she needs to go to the washroom. Training Pants: After 2+ years of cloth diapering, I wasn't about to start buying disposable training pants when we were so close to the end. I ended up getting a pair of Bummis Potty Training Pants. However, my daughter only wore that one pair a handful of times. When she did they worked. But for us, potty training was a bit all or nothing (which is totally my daughter's personality with everything). We went from lots of 'accidents' to one day her just deciding she was ready and boom, both day and night potty trained. I had her wear the pants maybe a few times to be sure but she didn't need them. To be honest, I kept putting a diaper on her overnight even after it had been dry in the morning until one night my husband and I went out and we didn't specify to the babysitter that she was to be put in a diaper before bed, so she wasn't. She woke up without an accident and never wore diapers again. However, I do feel like with my son, I will get more use out of that one pair and will probably invest in a few more- he's not so all or nothing- more like barrel ahead bull in a china shop kind of personality. But I would suggest holding off and seeing if you even need any kind of training pants at all or start with one like I did. Eating Glasslock: I love glass containers! I have an entire blog post on why we are anti-plastic here. We have switched out all of our plastic for Glasslock containers- which we get by the set at Costco. However, I also got a few wean green cube containers specifically for my daughter- in pink of course. I like these little containers a lot- they are small, easily portable and can be tossed and left in my diaper bag with some snacks. I also like that I have separate containers just for my kids stuff since it is easy to use up all the small Glasslock containers in the house- these I only use for kid stuff. I use these daily even now. PlanetBox: The down side of glass containers is that for a preschooler, they can get pretty heavy, pretty quickly in a little backpack. Add to the fact that the more containers you send, the more they have to lose. My daughter started Montessori preschool this past January and so we invested in the PlanetBox. This elusive little box can be a bit of a challenge to find as it's not widely available in Canadian stores though there are retailers and they are listed on the website by location. It can also be ordered directly from the company's website and shipped from the US. This little box is also not cheap, it is an investment. And if you do buy it from a store in Canada, you only have the option of the full set- the box, insulated bag, 2 round containers and magnet set. However, I can not say enough good things about this lunch box! I love it because it is all stainless steel- no plastic or leaching chemicals, it is extremely easy for kids to use, it is one piece so virtually impossible for a kid to lose and the little divided compartments make it kind of fun to pack! I actually like coming up with a few little items to put in every day and the aesthetic appeal of the end result is like a little pat on the back for me! 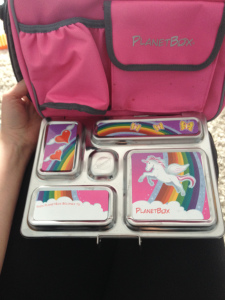 The main 5- compartment container with magnets and insulated carrying bag. 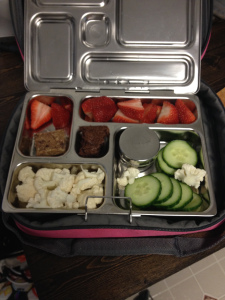 A packed lunch example with the small round leak proof container. The main container is not sealed so 'juicier' things like watermelon will leak. The small round containers do have a silicone ring to make them leak proof so you can use them, I just don't bother, the little bit of liquid that might leak out is caught by the insulated bag anyways. I do however, use the leak proof containers for things like oatmeal or yogurt and they work perfectly. I figure my kids are going to be having school lunches for the next decade and a half so in the long run the cost was worth it. You can also buy the magnet sets separately so if they change interests, outgrow, just want a change or even lose them it's only a few dollars for a new set. Water Bottles: I really don't know how it happened but we have accumulated a serious stash of water bottles! We have a mix of stainless steel Klean Kanteens, our glass Life Factor Bottles and even a stainless steel Thermos with a flip top and straw. All of them have strengths. 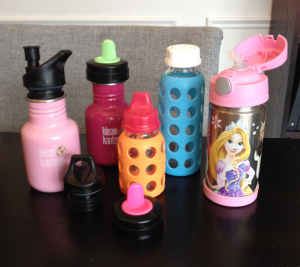 Our various bottles and cap options. What I really like about the Klean Kanteen is the array of lids you can get- solid both plastic and stainless steel, sport cap, even sippy cup attachment lids. I also like that since they are steel they are indestructible. The Life Factory are great because they have transitioned from bottle through to sippy cup and plain drinking bottle. My least favourite is the Thermos, my daughter loves it because it has the Disney princesses on it and she likes the straw part. It's my least favourite because the straw and lid are plastic. However, it's a very minimal amount so I'm not overly concerned but my preference is none so I do prefer the others. I will also note that I am not a huge fan of prolonged sippy cup usage. I find these kinds of cups are great on the go to pack but I am all about letting my kids learn through doing- they get regular cups/plates/forks/etc. and I allow them to figure out feeding themselves. Yes, it gets ridiculously messy at times, but they learn fast. My son (who turned one less than a week ago) already feeds himself breakfast- sometimes with the spoon, sometimes more with his fingers, but he is learning and his fine motor skills and coordination are getting a work out! 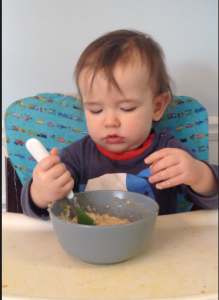 Eating oatmeal at 11 mos old. Figuring it all out! High Chair/Booster Seat: I prefer the look of wooden high chairs but I didn't want to shell out for one so I found a used one on kijiji which is perfect! Ours is an Eddie Bauer, it came pretty scratched but since we got it, it has definitely gotten more beaten up and caked with baby food on a regular basis. They are necessary evils because you obviously need one but they are bulky, take up space, heavy to move/not very portable, etc. Around a year or so, we switched from the full high chair to a Fischer Price booster seat we picked up at Toys R Us on sale. I like the booster seat more because it can be put on a regular chair so it doesn't take up extra space and there is no tripping over it. The child can also sit right at the table for meals which I really like and it's portable. However, I don't think it is nearly supportive enough to use with a 6 mos old, so I don't think it could replace the high chair, the main benefit is that you can get rid of the bulky high chair faster and the booster is way more convenient. Being able to have your child sit right at the table with you for meals is also great for establishing healthy meal time routines! Washing Tub: We bought our home as a fixer upper. Pretty much everything was original from 1975. It was like entering a time warp. When we renovated our bathroom we ripped out the bath fitter bath and shower stall and replaced it with just a shower and glass doors. We no longer had/have a bathtub. We registered for a little whale tub at our shower which we received and had used it until our daughter had well outgrown it. We had tried to just use the shower however, that was not as convenient at all. Between the too small whale tub and shower, we made due though. After a friend's son received a bunch of bath toys for his birthday, I decided I wanted a tub that I could bathe my daughter in and that she could actually play a bit in. The water in the whale barely covered her legs at that point. I was also pregnant and showering her became much harder and less of an option, so a tub made sense. I did a bit of research and found a foldable tub by Prince Lionheart. I love this tub. 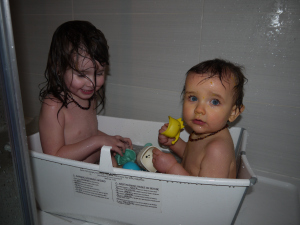 I have gotten a tonne of use out of it and now with my son I use it regularly. If we had a real bathtub this would be of zero use but since we don't it's a great replacement. The best part is that it folds flat and can be stored MUCH more conveniently than the whale tub. Because we had this tub, my son only used the whale tub for a short amount of time (maybe 4-5 months), as soon as he was able to sit up a bit we moved on. Even compared to a regular bath tub it has the benefit of being able to use WAY less water than is necessary to fill a full sized tub, which I also love. When they were really little/newborns I actually preferred just taking them in the bath with us and letting them float a bit (my midwife suggestion) but when that wasn't feesible/convenient I did find the whale tub very useful and since moving and having no full bath tub, a replacement option became more important. Though the foldable tub is on the small side, both my children can fit in- my daughter pretty much insists on bathing with her brother (see photographic proof above)! I wouldn't use the foldable tub for a newborn though, as I feel it would be a bit too challenging to wash and support them at the same time. Products: This topic could be it's own blog post, and probably will, so I will keep this short and sweet. A lot of people will turn to the classic 'Baby Soap', you know the one(s) I am talking about. The down side of these is that they are usually loaded with chemicals including formaldehyde(!!!). They are pretty much the worst thing you can slather on you child. For my adult patients, I encourage removing all the chemicals from personal care products (phthalates, parabens, fragrance, etc.), for newborns/infants/children (even pregnancy) this is even more important since their detoxification pathways aren't matured yet. I favoured Pretty Cosmetics at the beginning- they are local (Toronto), completely chemical free, a good mom/baby line and reasonably priced. However, they can be a bit tricky to find, though online ordering is an option. Since my second child however, I have switched my skin care to Cocoon Apothecary they are VERY local (located in Kitchener), exceptionally clean and organic, very reasonably priced and work amazingly well! I love them so much I started stocking them in my practice so that patients would have access!  My Cocoon line-up! So pretty no!? They don't do a separate baby line because all their products are so clean they can be used on any age without concern. My daughter loves to be my shadow and insists on putting on special 'see-mum' (serum) with me at night, and I let her, because it is simply organic Rosehip oil. Cocoon also does bar soap (my preference as it is much less likely to contain 'extra stuff') however, it is only available at their retail outlet. There are some other great Mom/Baby companies such as Earth Mama, Angel Baby or Dr Bronner's Castile Soap which are much more accessible and have amazingly clean products as well. And, you can always check your products toxicity rating at Skin Deep by EWG. This is an area where you do not want to skimp! 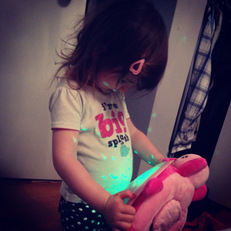 Sleep
Nightlight: I never volunteered a nightlight. However, around 2.5 years old, my daughter started to dislike the dark and wanted a light. My hesitation with standard nightlights is that they plug in and are on all night which is not good for melatonin production and sleep. Whether it's an adult or a child, sleep should happen in as dark a room as possible. We ended up getting her a Cloud B Lady Bug Nightlight. I went with this one because it can double as a comfort toy, it projects the constellations on the ceiling and the best part, it automatically shuts off after 45 min. It does NOT play sound, it simply lights up and has exactly 4 buttons- on/off and 3 buttons for the different colours- pink, green and purple. It does it's job perfectly- it is on long enough for my daughter to fall asleep and then she is still sleeping the entire night in darkness. I also find it really handy when she wakes in the night and needs to use the bathroom or if she isn't feeling well because you can easily just press a button and there is enough light to see but not enough to really stimulate and wake you or her up. Hers sits on her night stand so it's always accessible. It's portability is also a huge plus and I have found it has helped with being comfortable sleeping in a 'new' place, like visiting grandparents. I like to use gift giving holidays to give things that I wanted to get anyways- she got hers as her Easter present last year (this year she got a suit case, lol). Things We Passed On Feeding: Again, aside from our stainless steel plate/bowl/mug set and silicone covered spoons, we don't have any different items. Both kids use regular plates, cups and silverware just fine, though I do have ikea stuff for them just incase it breaks. We also started letting our daughter use a dull butter knife around 2.5 years of age and now she will prepare snacks/chop fruit all by herself! Toddler Bed: I don't see the point in a toddler bed, so we didn't bother- we got her a twin bed frame (second hand) but spent the money again on an organic mattress. We simply use a bed rail to make sure she doesn't roll out. Double Stroller: My husband has pretty much completely veto-d this idea, since we have barely used our single stroller. I feel like it may come in handy as my kids get bigger and heavier and eventually uncomfortable to carry but then again, anywhere we go where there will be a lot of walking (like a zoo) you can usually rent some kind of wagon for the day. I am leaning more towards getting the 'skateboard' attachment for the stroller we already have which will probably do the trick when needed. We'll see... Disclaimer: Naturopathic Doctors strive to provide individualized health care. The information contained in these topics is not intended nor implied to be a substitute for professional medical advice, it is provided for educational purposes only. This information shouldn’t take the place of seeing an ND for individualized health recommendations.
1 Comment
 Becoming a parent is a huge learning curve. There are so many products on the market and so many opinions on what you should and shouldn't do. After having 2 children, I've learned a lot about the things you need and the things you can pass on. Lately, I've had a few friends and colleagues ask about my experience with some of the baby things we used so I figured it would be easiest to blog about it all! I should start by saying, we were/are minimalists when it comes to the 'stuff.' I even had a few people comment about how there was 'nothing' on our baby registry- we pretty much stuck to just the cloth diapers we wanted! So here is the stuff we loved, passed on and things we would have changed! (Also, I have no affiliation with any of the products or companies- just one holistic Momma's experience!) Diapering
 Homemade Bum Wipes Homemade Bum Wipes
 LifeFactory bottles with all the caps and adult water bottle. LifeFactory bottles with all the caps and adult water bottle. Feeding
 Lunchbot stainless steel plate. Lunchbot stainless steel plate.
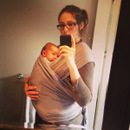 Caden 17 days old. Caden 17 days old. Transporting Carriers/Babywearing: I love babywearing! It is by far my favourite way to transport my kidlets! We did get a stroller and my husband calls it our most expensive dust collector...although I still think a stroller is a necessary item. I have used a few different carriers and I find each has their pros and cons.
 Hanging out in the sling at St Jacobs. Hanging out in the sling at St Jacobs.
 Lily 3 years old, 30ish pounds in the back carry. Lily 3 years old, 30ish pounds in the back carry. Structured Carrier: We originally registered for and got a Baby Bjorn. I did not like it. I found it was very hard on my back and I don't think I ever really wore it. My husband used it a handful of times and that was it. I also read a bunch of reviews (after we got it of course) about how it can be very hard on baby's hips which turned me off as well. However, when my second was born I got a bit more pushed to get a structured carrier. I knew trying to wrangle a 3 year old and manage a newborn was not going to be an easy feat, especially with our weekly visits to St Jacob's Farmer's Market. I looked into a few different ones and ended up going with the Ergo. My butterball son was born pretty big, so I wasn't sure whether we needed the infant insert. Thankfully we waited until after he was born to purchase it and I was able to take him and the carrier to my favourite baby store (Snuggle Bugz) to 'pre' test out the infant insert. Sure enough, there was no getting our fatty baby into it. I love this carrier! I have used it with both my kids- my 3 year old as a backpack and my infant in the side and front carry. It isn't the best carrier for small infants as it requires their legs to be spread pretty wide (for hip support) and I found it wasn't until about 5/6 mos that my son really started fitting it well. You can rig it to work before then but it's not really ideal. The infant insert would also help, as long as your infant isn't too big for it.  Our son was born at 8 lbs 10.5 oz and at 6 weeks was 13 lbs 7 oz and 23.5in- size wise too big to fit in the insert but development wise (hip range of motion and neck support) still needed the extra support. Because of this, I would recommend waiting on the insert until baby is born to make sure you can use it/need it. I find it super comfortable to use, even with my daughter who is about 32 lbs. My son loves it and has no problem falling asleep in it and it is amazingly easy to discreetly nurse while wearing it! We do have the original carrier which is only a 3 position carrier- back, side and front (facing you), however, since we got it, Ergo has come out with a 360 carrier which has the 3 positions plus a front carry facing out. I think if they had released the 360, I would have splurged on it but I haven't researched it enough or tried it to say for sure.  We also got the organic bamboo teether covers (the white covers in the photo above) since our son is like a beaver, but I wouldn't have needed them with my daughter. And another really cool thing about the Ergo is that they make kid size doll Ergo carriers! My daughter LOVES being just like Mommy!  Just lounging in the Snuggle Nest! Just lounging in the Snuggle Nest! Sleeping
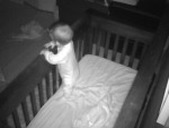 Planning his escape- night vision. Planning his escape- night vision. Turns out, it's all wifi these days! We couldn't even get the camera we had. So I got a D-Link wifi baby camera to test out- I wasn't prepared to go wifi and I had a toddler and 6 mos old so I grabbed what I could and brought it home. As I waited for my warranty gift card to arrive so I could return and re-buy my camera, I thought about what I wanted to do- baby monitor cameras are over double the price of regular wifi cameras and essentially do the same job. The baby monitor camera has the added feature of 2-way speakers aka you can talk to baby through the camera and you can play music through the camera. Both the Summer Infant and Motorola sets had these features and we NEVER used them. Talking to your baby when they are trying to sleep is game over. Both the regular and baby wifi cameras have similar display quality, night vision, motion detection/notification, sound, recording function and picture function. But the regular camera is about a third of the price of the baby camera. 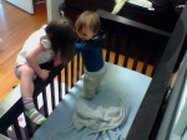 Inseparable- day vision. Inseparable- day vision. So we decided to go with a regular D-Link wifi camera- 2 actually, one for my son's room and one for my daughter's, and they are perfect! You operate both using a downloadable app and as an added bonus compared to the camera/handheld display type, you can access the camera from anywhere! I can check my kids from work if I want to right from my iphone! I love these cameras! Even once our kids are too old for monitors we can transition these to their intended security camera purpose. The one downside of wifi vs the traditional set is they aren't as portable. You can't really take it with you on a trip without needing to set up the camera all over again on a new network and you can't pan with these, the cameras are fixed and have to be moved manually. Even with these limitations, for me wifi benefits surpass the down sides. 
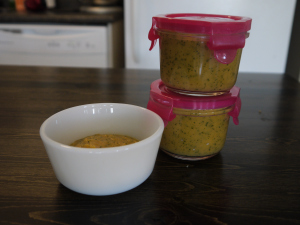
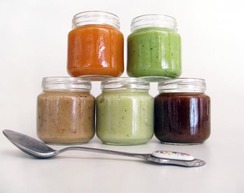
So, I think I've hit all the big items, at least I can't seem to think of anything else! I will be doing a continuation post on cloth diapering since it is such a huge topic and likely a toddler/preschool post since my daughter is now 3 and a half and there have been some things we have found that we love for this age group...so stay tuned! Hope you find it all helpful! Disclaimer: Naturopathic Doctors strive to provide individualized health care. The information contained in these topics is not intended nor implied to be a substitute for professional medical advice, it is provided for educational purposes only. This information shouldn’t take the place of seeing an ND for individualized health recommendations.  There are many reasons why you should consider making your own baby food versus buying the pre-made. Making your own baby food lets you know (and control) exactly what you are feeding your child. By making it freshly at home you can skip any added preservatives, such as extra salt. Also, you can control the cooking method and freshness to ensure that you are getting the most nutritional value from your foods. It's also pretty fun creating new concoctions for your little one to try! I have found it to be a great experience and pretty easy as well! So for anyone who is considering this but a little hesitant on where to start and whether it's for them or not, here are some tips and tricks and things I have learned along the way.

 A Couple of Notes:
 Disclaimer: Naturopathic Doctors strive to provide individualized health care. The information contained in these topics is not intended nor implied to be a substitute for professional medical advice, it is provided for educational purposes only. This information shouldn’t take the place of seeing an ND for individualized health recommendations.
 When it comes time to introduce solids to your little one, it can be confusing! There is so much information out there, and it's hard to know where to start, or when to start! So here are some of the basics! When to start: Though some practitioners may recommend beginning little ones on foods around 4 mos, I would recommend pushing off until as close to 6 mos as possible. Babies' digestive tracts are still developing but are almost fully matured around 6 mos. By delaying food intro until then, can help reduce the risk of developing food sensitivities. However, it's also important to follow babies lead. We introduced solids at 5.5 mos after many cues from Lily that she was ready, my favourite, opening her mouth along with our bites! What to start with: This is probably the most confusing part of food intro! And there is lots of info.....

How to Start: When baby seems ready pick a day and plan it out.
 Disclaimer: Naturopathic Doctors strive to provide individualized health care. The information contained in these topics is not intended nor implied to be a substitute for professional medical advice, it is provided for educational purposes only. This information shouldn’t take the place of seeing an ND for individualized health recommendations.
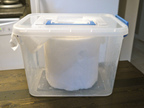
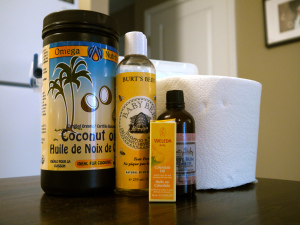 There is nothing better for a parent than a happy rash free baby bum. Baby wipes are a necessary evil. There are many wipes on the market claiming to be natural or organic with a hefty price tag. However, even these tend to contain chemicals that are known skin irritants. The only way to ensure that what you are using is safe and natural is to make it yourself (this is the same rule that is recommended when it comes to cooking!). I started out using Natural Sensitive Baby Wipes but have since switched to homemade wipes and i. love. them. Not only are they exceptionally simple to make, they will save you a couple dollars to boot! What you need:
 A couple notes: If you choose to use coconut oil, you'll need to use warm water so that the oil melts since it's in a solid form at room temperature. I also like to add a couple drops of Calendula Oil to the mix to help soothe any sensitive skin, Wedela has a great one! This batch of wipes I also added a bit of Baby Bum Remedy by Pretty Cosmetics (an amazing holistic skin care line). Also, I have been using Paper towels from Costco, which are extra large so I use a bit extra of everything to make sure all the towels are moist. This recipe is super versatile too and can be used as wet naps or even make up remover towlettes!  Disclaimer: Naturopathic Doctors strive to provide individualized health care. The information contained in these topics is not intended nor implied to be a substitute for professional medical advice, it is provided for educational purposes only. This information shouldn’t take the place of seeing an ND for individualized health recommendations.
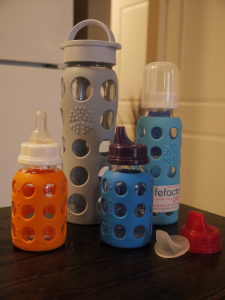 When it came time to pick out bottles, I knew I wanted to stay away from plastic, BPA-free or not. Personally, I love glass. We now only have glass containers so why not glass bottles. After a bit of research I found Life Factory.
They make bottles, baby ones and even adult water ones. And they come with fun colourful silicone sleeves to help prevent breakage, should they be dropped (and if you are skeptical, trust me it does work!). The nipples that come with the bottles are plastic free also, they use silicone instead. The bottles are easily heated, sterilized, super convenient (and super cute) and because they're glass, they don't wear out. I even have the adult water bottle, I received as a bday gift (thanks Mal). Annnnnd my favourite part about them was just discovered a week ago....they make a sippy cup attachment (that little pink cap in the pic)! So, the bottles you used with your tiny baby can keep being used with your bigger baby! The sippy cup attachment also has a silicone insert (that white "mini sippy attachment") to help control the water flow. Overall, these bottles have worked wonderfully!! Disclaimer: Naturopathic Doctors strive to provide individualized health care. The information contained in these topics is not intended nor implied to be a substitute for professional medical advice, it is provided for educational purposes only. This information shouldn’t take the place of seeing an ND for individualized health recommendations. |
AuthorWrite something about yourself. No need to be fancy, just an overview. Archives
August 2016
Categories
All
|
 RSS Feed
